Ladies,
Here is a golden gem of age-old fashion advice: when a piece of clothing checks all the boxes in fit, your style preferences, and the way it flatters you, buy (or sew) many! There is no reason to reinvent the wheel. No one has to wear completely different clothing all of the time. When you find a shape, a color, a kind of fabric, anything you like, wear it and wear it again.

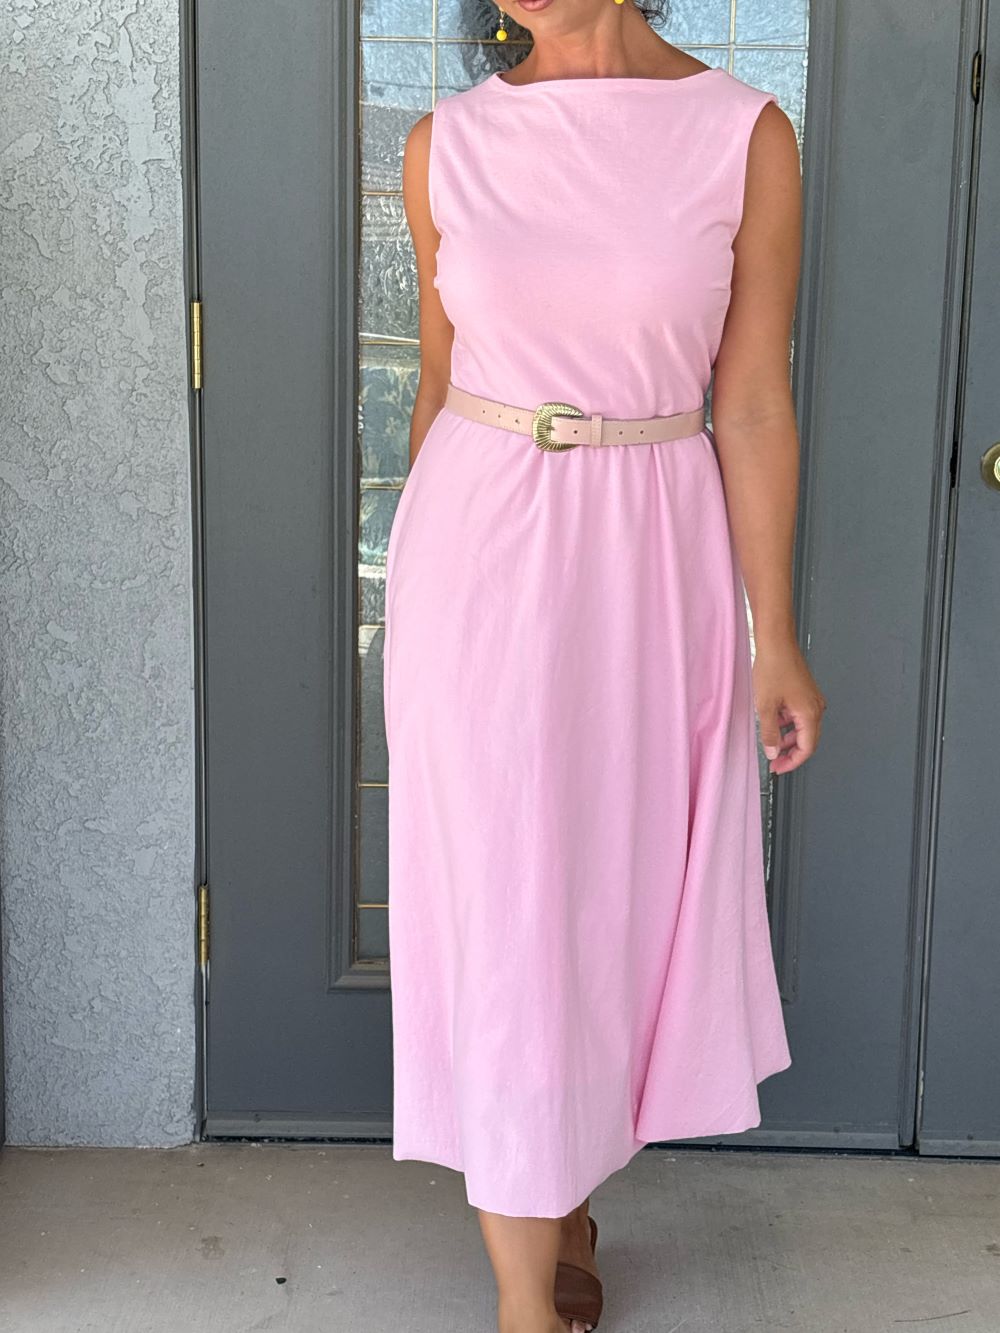
This is a sewing pattern that I used to create this boat neckline pink midi dress for summer. This season I had seen one similar on the Nordstrom website for over $300. That one was in a woven non-stretch fabric. However, I recreated the style with a cotton spandex stretch knit. I enjoy the ease of a stretch knit as far as comfort goes and I also love that I can pull it over my head without a closure, not because I don’t want to install a zipper, but because it is one less thing to worry about when wearing it. I once went to church with my dress UNZIPPED in the back from about the middle back upward. As I was about to walk into the sanctuary, a horrified and kind woman ran up to me and quickly zipped me all the way up. I am pretty sure my bra band was on display. I was so humiliated that after that, I started sewing dresses that I could just pull on because I thought….”maybe I need something with less room for user error”. It was after that experience that I realized we need to look at ourselves from every angle in the mirror before we leave the house! I still sew dresses with zippers. But it’s nice to have a pull-on option too.

Below is my entire sewing pattern rundown on what I did to make this dress for someone looking for the technical details. But before that, let me wax a bit about the style. The boat neckline is so demure in classic beauty. This neckline style was worn by some of the most graceful dressers, and it reminds me of Grace Kelly and Audrey Hepburn. In my dressmaking, one thing of utmost importance is that the shoulder width fully covers bra straps, which means I tailor the pattern to be wider in this area as most are not ever wide enough. This is a feature I find consistent in well dressed women throughout history as well as the present day. I also love longer length skirts and tend to make the majority of my wardrobe at tea length (right above the ankle) or a midi length. One of my pet peeves about modern day fashion is how see-through everything is contrasted to historical fashion where women wore layers, and clothing fully concealed their bodies. Something I have consistently done for the sake of completely opaque skirts is to line them but consequently have found that it makes even the cheapest or most casual of fabric look better. Lining a skirt gives a quality of structure that looks really nice.

The Details of Making this Easy-to-Sew Dress
Simplicity 8874
View: A with a self-drafted boat neckline variation.
For reference my measurements are: 36-28-39. Height: 5’1″, which makes me a petite size.
Ease Preference: I prefer my garments to be semi-fitted, never tight, with about an inch of ease, even in knit fabric.
Size Used: 12 bodice & 14 Skirt
Size notes: I used a size 12 bodice with a 3/8″ seam allowance and a size 14 skirt with a 3/8″ seam allowance.
Seam allowance changes: Changed seam allowance to 3/8″ for the following: Back seam of skirt, side seams of skirt, side seams of bodice. I did the 5/8″ seam allowance for the boat neckline that I drafted.
Seam allowance not changed: Kept 5/8″ seam allowance for the following: Shoulders, Armholes, bodice back seam, skirt to bodice seam.
Seam allowance for sleeveless: 5/8″ for connecting armband to edge of amscye. Then I hand sewed the armband down to the bodice lining only so the seams would not show on the outside. I did not clip the armband but sewed close to the edge of the seam allowance so that it would stay inward and not flip outward of the armhole.

Fabric Used: This is a pink cotton spandex jersey knit. It was too thin and transparent in a single layer, so I lined the bodice with the same cotton spandex fabric for it to breathe against my body, and I lined the skirt with a lightweight polyester interlock lining fabric. This acts as a silky slip beneath the clingier texture of the cotton fabric, and it makes the skirt fully opaque. I chose to not hem this dress because knit does not unravel, and I liked the almost “lettuce hem” effect that the natural curl of the hem has when just cut. I did not think hemming would improve the look, so I left it. Especially since this dress is meant to be a nice casual dress, leaving it cut and unsewn was appropriate for a casual day dress. If I decide otherwise, I can always revisit this and hem it.
Knit Fabric notes: When I first made this dress, I used stable knit that is thicker like liverpool and I found that folding the neckband & armband in half as the pattern tells you, does not work because it makes it too bulky. But this time, I was sewing with a regular cotton spandex jersey knit but because I lined the bodice, it was also too thick to fold the bands in half. I still sewed just one layer edge of the neckband and armband, to the bodice edge. Then, I fold it inside (keeping outside fabric slightly overhanging & press in place) and stitch it down either from the inside or top stitching. For this dress, I did not want to top stitch for a completely clean look on the outside.
No Top Stitching How-to: I sewed my bodice and bodice lining together at the neckline with rights sides together. I turned it right side out and pressed the outer bodice about 1/16″ to overhang the lining enough to cover the edge that is sewn together. Then I under stitched the seam allowance to the bodice lining and clipped the excess fabric. This created a seamless finish from the outside.
Fit Problems: As detailed in previous reviews of this pattern, I had to tailor the fit of this bodice quite extensively to fit me correctly and cover my bra straps. View A (square neckline): The front & back bodice was too low. Both View A (square neckline) & View C (crew neckline): The upper back was 2″ too loose around the upper back/neckline. The bust dart was way too long, and the point sat exactly at the bust apex. View C: (crew neck) The shoulder width was way too narrow resulting in the sleeves being pulled up and the shoulder seam bunching up on top of shoulders and not laying. This problem was the same in View A but less severe because the more open square neckline made it hang a bit better. Even in a much larger size this narrow shoulder design would not have been wide enough for me. I added 1.5″ width to the shoulders in both views.
Fit Adjustments: View A: Raised neckline 2.5″, raised back neckline 2.5″, reduced neckband 2.75″. View A & C: Reduced upper back/neckline 2″. View A & C: widened shoulders by 1.5″ grading down into armsyce front and back. View A & C: reduced dart at bust by 2.5″ to sit on side of bust not on the apex, shortened skirt 4″.
What worked without fit adjustment: No petite waist adjustment needed. The waist sat high for a non-petite pattern. The size 12 fit was correct in the neckline, armholes, sleeves, and skirt. Any larger of a size would have been too big in those places.
Design Adjustments: I cut the skirt front pattern piece on the fold to eliminate the front seam. This made it a bias-cut skirt. I did not subtract the seam allowance from the skirt front when I cut it on the fold. This gave the belly more space and it looked completely fine when sewn to the bodice. It fit me better by not being any tighter. I aligned the back pattern piece directly below the front pattern piece in order to get the grainlines on the exact same angle. I cut the skirt back pattern piece 1″ in from the fold in order to cut 2. I would not eliminate the front skirt seam in every creation, but for certain fabric/style it looks better. The bias-cut skirts work beautifully.

How many times sewn this pattern: 3.
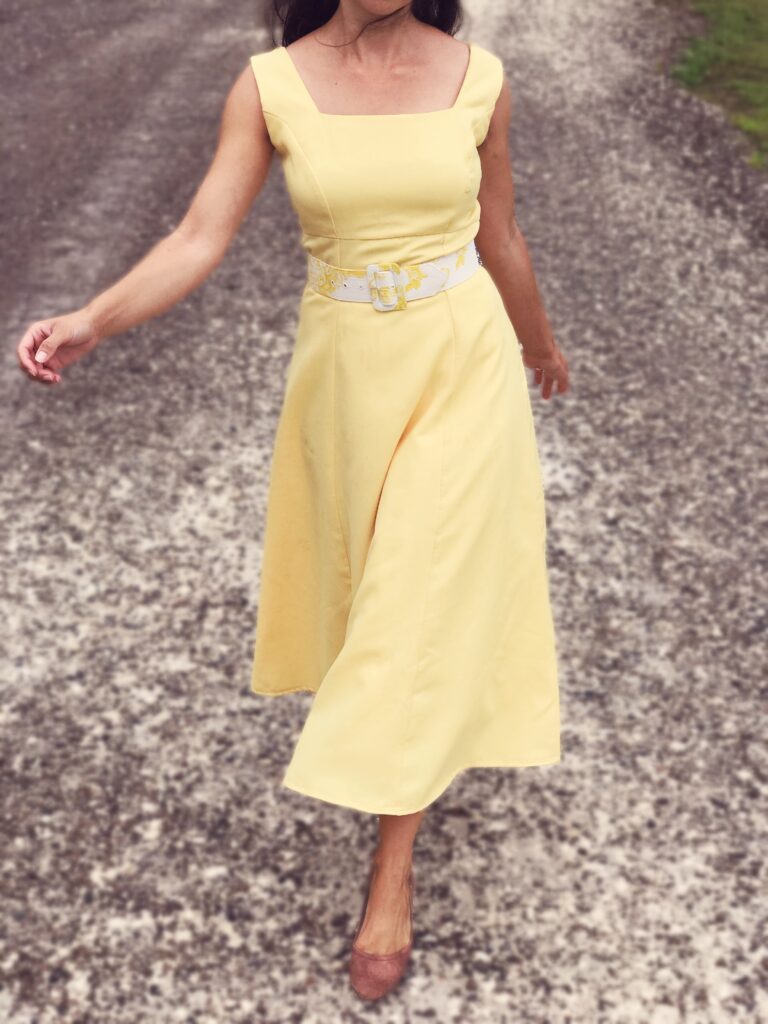
Describe each creation: The first was View A in a liverpool knit (ivory & black polka dot), read all about it here. I later realized that the print disguised the bust dart issue of being too long and ending right at my bust apex. I did notice the shoulders being too narrow, but it was not as severe as when I made view C (crew neck). I lined it with white ITY fabric.

The second make was View C in a liverpool like knit (solid yellow), read all about it here. The shoulder issue and bust dart issue were more severe and obvious problems in a solid color. I scrapped the first bodice I made and widened the shoulders & reduced the bust dart and then remade the yellow bodice with the fit adjustments. I then applied these changes to both view A & C pattern pieces. I did not line the bodice of the yellow dress, but I did line the skirt with a white, light weight, polyester, interlock lining fabric.

What I love about this dress: This silhouette of dress is one of my go-to for any dress I make. When fitted correctly, this shape does not add bulk to my belly or hips. The shape is neither too slim nor too poofy. It has a good amount of fabric to give it swish but retains a sleek look. I like that I have different neckline and sleeve options that really change the style. I enjoy the boat neckline version of this dress as it is another classic rendition of this style. Even though this boat neckline is not included in the pattern, it was easy to draw this shape and overlay it right over the neckline using the same bodice pieces, so nothing changed except cutting the neckline shape differently.

Pattern Instruction likes or dislikes: Every step was clear and easy to understand. Instructions produced exact results when followed. When I have done the sleeves, I sewed them exactly as instructed and they were the best sleeves I have ever done!
What I dislike about this pattern: Nothing disliked. Except I had to tailor the bodice quite a bit to my shape. But I find that I have to do this for most patterns.
Difficulty Level: This is not a difficult pattern but fit adjustments like widening the shoulders can be difficult for a beginner. But this is a friendly pattern to learn to do basic fit adjustments like that.
Most Challenging Part: When doing top stitching on the neckband, it needs to be sewn extremely carefully on the curves so that it maintains alignment with the bodice edge. Every stitch needs to be in a straight line along the guide. Any slight veer off the guide or any fabric shifting out of alignment along edge will show in the neckband looking wider or narrower in places. Pin in excess and go slow. Since I did this boat neckline without top stitching it went much faster and easier.
Would I sew it again: Yes, and since my fit adjustments have been made, I have continued to sew new versions of this dress.
Happy summer dress season! I hope you sew or buy something to brighten yours and your family’s days.
WHATEVERLOVELY.com
CHRISTIAN LIVING – FASHION – HOME

Leave a Reply